RECENT POSTS
AWS Website with Jekyll
Feb 15, 2018 • Russell A. Ray
Let’s get ready to Rock
I start this session with an analogy from the 2003 movie School of Rock. I see web development much like creating a rock band. You start off with an idea of forming a band. Next, your work on recruiting band members with specialize skills or musical talents. From there, a band develops their repertoire of songs they can accomplish for a performance. Web development is similar as you start with a idea for a website and you work on building the website with technologies. Next, you develop a group of pages (songs) for your show on the Internet (performance). This post details how I brought up my website using several technologies for what I call the “concert” performance.
Work in the “garage” before you hit the AWS stage
In my last post, I identified the band members and some of their specific talents. The garage is synonymous with working local on your laptop or desktop when developing the website. Using Visual Studio Code provides that special talent much like a sound mixer whereby you can adjust the different qualities of the sound until you have it just right. In my case, you can adjust the page using Markdown and Jekyll until I have just right. In a side-by-side preview window you can see how the individual page would appear on-line.
The first thing we need is setting up the instruments. Here I use the _config.yml file presets that comes with Jekyll theme I have picked out.
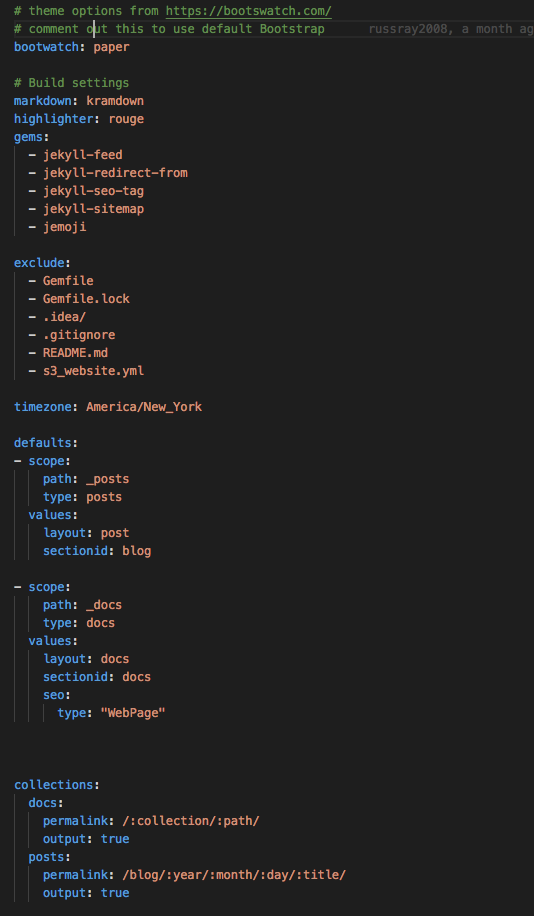
| Tools | Purpose | |
| Note: Sitemaps are an easy way for webmasters to inform search engines about pages on their sites that are available for crawling. | ||
| bootwatch | Theme for style for pages | |
| kramdown | Parser for Markdown | |
| highlighter | Syntax hightlighter used in the generation of documents | |
| Ruby Gems | ||
| jekyll-seo-tag | add metadata tags for search engines and social networks | |
| jekyll-sitemap | silently generate a sitemaps.org compliant sitemap for your Jekyll site. | |
| jekyll-feed | generates an Atom (RSS-like) feed of your Jekyll posts | |
A guitar solo starts with the Command Line
There is a high possibility any song you play on a guitar will consist of one or more of the basic 10 guitar chords. In our effect there are at lease three chords I used in the creation of my website. The bundle exec jekyll serve generates the files required for your website. Also included is an application server to host your website locally. It can be reached on your laptop at http://localhost:4000.
| Chords | Purpose | |
| Note: Bundler[sic] provides a consistent environment for Ruby projects by tracking and installing the exact gems and versions that are needed. | ||
| Note: aws The AWS Command Line Interface is a unified tool to manage your AWS services. | ||
| Note: s3_website Create and configure an S3 website for you, uploada your static website to AWS S3, and helps you use AWS Cloudfront. | ||
| bundle exec jekyll serve | If you don't have a Gemfile then you can create one with bundle init and adding the gems you should run that in Jekyll root folder. jekyll serve serves your site locally for development purposes. | |
| aws s3 cp . s3://mybucket/ --recursive | by default, all files are included. The command follows a protocol: aws [options] [command] [subcommand] [parameters] | |
| bundle exec s3_website push --force | run the initial push with the --force flag just to make sure it updates cache metadata for all files | |
First dress rehearsal begins with HTTP
We have been practicing our music in the garage long enough. Now, it’s time we need to move the band into another venue. For our effort in creating a website, this means moving the site files to the AWS S3 bucket that we have created. I started copying the files into the aws s3 bucket using the aws-cli tool.
Rehearsal all your music–all hyperlinks are working
Now we have all our songs in the new venue and out equipment is setup, let’s play the the songs to ensure all sound great with the acoustics of the venue. This translate in navigating throug hte different pages and ensure the pages are working without error. This include all the links. In my effort I found two links were not working. This cause the error page to to display and the listing of all my posts. Once I made the changes and re-deployed to the S3 bucket, I was ready for the next step.
Protect your band using CloudFront’s Distribution
Now with our band working smoothly, let’s get ready for our performance. In my website development that means putting my website under protection of https. I used the CloudFront as a means of protecting the website. It was not a difficult task as there are many others who have documented their steps. I followed Oliver Patterson’s blog. It was the best help detailing the different steps in pushing the code out to the different end locations and keeping everything under https. Since my effort is more educational for myself and documenting my journey only, I limited viewership to only the United Status. This effort reduce the number of requests to the site by 60K and reduced my overall cost for the website. I kept the deployment under the http protocol until I was sure it was all working.
Setting up Alias for your concert
There is much work about sound propagation in concert halls and how sound moving through an enclosed areas can be manipulated for the best listening pleasure of concert goers. In web development, I equate this to domain routing that controls the movement of browser requests to individual web sites. Amazon Route 53 was created as a highly available and scalable cloud Domain Name System (DNS) web service. It is designed to give a cost effective way to route end users to Internet applications by translating names like www.clouddeveloper.net into the numeric IP addresses like 192.0.2.1 that computers use to connect to each other.
In our case we need to route our users from the clouddeveloper.net address to the CloudFront distribution we created earlier. Luckily, AWS has provided easy instructions for us all.
You are now ready for HTTPS–Rock on
Mic C-h-e-c-k, Mic C-h-e-c-k, Blah, Blah, Blah. Just like every concert performance, we check the sound to be sure everything is ready to go. In the last few steps we look at securing out site with HTTPS, creating secure socket layer(SSL) and transport layer (TL) certificates, and creating an alias for the website so traffic can be correctly routed to the site
Update your settings
We will need a new S3 bucket that acts an a separate website but is private. For example, we use clouddeveloper.net as an original website. We have been working with this bucket already. Now, we want to create a new bucket www.clouddeveloper.net. For now, all we need to accomplish is creating the site. I will explain how we will use this new website shortly.
Create SSL Certificate
AWS has a free service for issuing SSL/TL certificates. It comes in handy as you can select the certificate in your CloudFront settings.
Redirect traffic to HTTPS
Update your CloudFront settings to redirect your traffic using HTTPS.
Create Canonical Name for Route 53
A Canonical Name record (abbreviated as CNAME record) is a type of resource record in the Domain Name System (DNS) used to specify that a domain name is an alias for another domain. When you update your CloudFront settings you can identify the CName for your site, such as clouddeveloper.net and www.clouddeveloper.net. When you update the settings, it will create the CName record sets in Route 53 for you.
Redirection other fans to your concert
Recall we created a second bucket and called it www.clouddeveloper.net. In the property section of the bucket, let’s make is a static website and redirect it clouddeveloper.net using HTTPS as the protocol call. You do this just in case your concert goers look for you under either address.